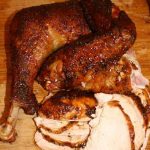
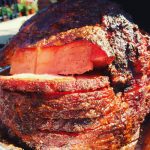
Sugar Daddy Ham

Sugar Daddy Ham

Sugar Daddy smoked ham with peach glaze
Prep Time30 minutes
Cook Time2 hours
Course: Main Course
Cuisine: American, BBQ
Keyword: Sliced ham, Smoked Ham
Servings: 10 people
Cost: $25

Equipment

  • BBQ grill or smoker

Ingredients

  • 8 – 10 Lb Cooked ham

Peach Glaze

Sugar Daddy Seasoning

Instructions

Peach Glaze

  • Whisk all ingredients together in a saucepan over medium heat until it reaches a soft boil.

Sugar Daddy Seasoning

  • Combine all ingredients in a small mixing bowl until well blended.

Cooking the Ham

  • Place the ham (large end down) on a wire rack in a shallow sided aluminum pan.
  • Brush on a generous amount of the Peach Glaze.
  • Next, cover the outside of the ham completely with the Sugar Daddy Seasoning.
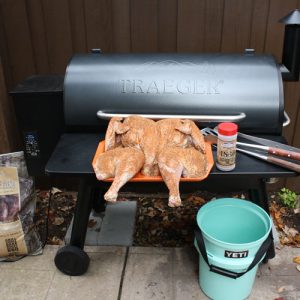
  • Place the ham on a grill/smoker at 250 – 275 degrees cooking temperature. If using wood chunks or chips – select pecan or other fruit woods for a mild smoke flavor.
  • Reapply the BBQ Glaze every 15 – 30 minutes.
  • Cook the ham to an internal temperature of 140 degrees.
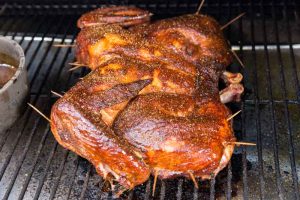
  • Cooking time can vary but it should be ready in approx. 2 – 3 hours. Do not over-cook or the ham will dry out, remember this is a pre-cooked ham, so you only need to warm it in order to cook the glaze and rub. When the ham is ready, the slices will start to separate slightly and the outside will have a crusty look.
  • Remove the ham from the grill and let it rest for a few minutes before slicing. Serve and enjoy!

Texas Chili Recipe

SuckleBusters Texas Chili

Winner of Chile Peppers Magazine recipe two years in a row!
Prep Time30 minutes
Cook Time1 hour
Course: Main Course
Cuisine: American, BBQ
Keyword: Chile, Chili, Texas Chili, Texas Red
Servings: 6 people
Cost: 10

Equipment

  • Large Cooking Pot
  • Cutting Board

Ingredients

  • 1 Lb ground beef (large chili grind recommended)
  • 1 Lb ground pork (or breakfast sausage)
  • 1 each yellow onion
  • 1 each green bell pepper
  • 1 each red bell pepper
  • 1 cup beef broth
  • 8 oz tomato sauce
  • 6 – 8 tbsp SuckleBusters Texas Chili Powder

Instructions

  • Brown the chili meat and sausage in a large skillet. Drain and discard the excess drippings. Add the browned meat to a large dutch oven or 6-quart cooking pot.
    Brown the beef and pork
  • Finely chop the onion and bell peppers, add to the dutch oven, cook until translucent.
    Diced onion and peppers
  • Add the beef broth, tomato sauce and chili powder. Stir until all ingredients are combined.
    Add all ingredients and cook
  • Bring to a low boil, cover, then reduce temperature to a simmer for 1 hour, stirring often. Add water as needed and salt to taste. 
  • Remove from heat, serve in bowls top with chopped onions and shredded cheese. This recipe won 1st place in Chile Pepper Magazine Awards in 2013 & 2014. Enjoy!
    Serving the finished chili

Video

Breakfast Tacos

Breakfast Tacos

Texas-Style Breakfast Tacos/Burritos
Prep Time30 minutes
Cook Time30 minutes
Total Time1 hour
Course: Breakfast
Cuisine: BBQ, Mexican
Keyword: Breakfast, Tacos
Servings: 18 people
Author: SuckleBusters
Cost: $25

Equipment

  • Dutch over
  • Cooktop or griddle

Ingredients

  • 18 each Large eggs
  • 1 lb breakfast susage or chorizo
  • 1 each yellow onion
  • 1 each red bell pepper
  • 2 each jalapenos
  • 1 tbsp diced garlic
  • 1/4 stick butter
  • 10 each corn tortilias
  • 36 each flour tortilias
  • 2 cup shredded cheese
  • 2 tbsp SPG All Purpose Seasoning
  • 1 tsp Texas Heat Pepper Sauce

Instructions

  • Brown 1 lbs breakfast sausage in a large dutch oven or pot. Remove from the pot, drain, and reserve
    brown sausage
  • Finely chop the onion, bell pepper, jalapeno
    finely chop onion and bell pepper
  • Add butter plus the chopped onion and peppers to the pot. Sauté until the onion and peppers become translucent & tender
    saute onion and bell pepper mixture
  • Add back the cooked sausage and garlic. Cut or tear the corn tortillas into small strips, add to onion & sausage mix (the corn tortillas soak up the extra liquids). Bring the mixture back up to a medium temperature
  • Add 18 large, beaten eggs
    18 large eggs
  • Cook over medium-low – med heat until the eggs are fluffy and done
    cook until the eggs are fluffy
  • Warn flour tortillas on a griddle using a little butter on each side
  • Spoon burrito mixture plus shredded cheese into flour tortillas. Add Texas Heat Chipotle Pepper Sauce
  • Serve and enjoy!
    Breakfast Tacos and burritos

Video

Peach Glazed Holiday Turkey

Peach Glazed Turkey

Spatchcocked, Honey-Peach Glazed Smoked Holiday Turkey
Prep Time1 day
Cook Time4 hours
Total Time1 day 4 hours
Course: Main Course
Cuisine: BBQ
Keyword: Spatchcocked, Turkey
Servings: 10 people
Author: SuckleBusters
Cost: $20

Equipment

  • BBQ grill or smoker
  • 5 gallon bucket

Ingredients

Instructions

Thaw and rinse the tukey

  • Frozen turkeys take about 24 hours to thaw at room temperature OR about 48 hours to thaw in the refrigerator
  • Start with a completely thawed turkey
  • Remove all additional internal parts; heart, neck, kidneys, and discard
  • Wash the turkey with cold water, pat dry and set aside

Preparation

  • Open the Area 51 turkey brine kit and add the small packet (herbs) and 4 – 6 cups of water to a large pot
  • Bring the water & herbs to a boil and then remove from heat
  • Add the large packet (seasonings) to the pot and stir until dissolved – about 1 minute
  • Next, add water and/or ice to chill the brine mixture
  • Place the turkey into the brine bag and pour in the mixture
  • Remove excess air, add cool water until the turkey is completely covered, seal the bag
  • Refrigerate in teh brine overnight
    Brine turkey in a 5 gallon bucket

Clean, spatchcock and season the turkey

  • Remove the turkey from the brine mixture, rinse with cold water and pat dry
  • Discard water/ice mixture
  • Place the turkey on a cutting board breast side down
  • Using a large butcher knife, slice down either side of the backbone, through to the inner cavity
  • Remove the backbone and discard it
  • Cut through thick end of the breast bone. This will help the turkey lay flat
  • Spread-out and flatten the turkey, then season the turkey on both sides using the Honey BBQ Rub
    Seasoned and ready for the grill

Cooking

  • Set up the grill to 325 – 350 degrees cooking temperature
  • Place the turkey in the cooking chamber, skin side up
  • Cook turkey until the internal temperature reaches at least 165 degrees in the thick part of each breast
  • Hint: Cooking time varies, but following the directions about, plan for about 3 hours
  • Brush on the Honey BBQ Glaze during the last 30 minutes of cooking

Serve

  • When the turkey reaches 165 degrees internal temperature, Allow the turkey to rest for about 15 – 30 minutes before carving
  • Trim off legs and wings first, then slice breasts diagonally
  • Serve and enjoy!

Video

Bacon Jalapeno Burger

Bacon Jalapeno Cheeseburger

Spicy and Tasty, the fresh jalapenos bring the heat to this cheeseburger recipe
Prep Time30 minutes
Cook Time15 minutes
Total Time15 minutes
Course: Main Course
Cuisine: BBQ
Keyword: Cheeseburger, Hamburger, Jalapeno
Servings: 6 people
Cost: $10

Equipment

  • Grill or Smoker2

Ingredients

  • 2 lbs 80/20 ground beef
  • 4 each jalapenos
  • 1 lb sliced bacon
  • 3 tbsp SPG BBQ Rub
  • 3 tbsp 1836 BBQ rub
  • 6 slices cheddar cheese
  • 6 each brioche buns

Optional Ingredients

  • 1 each sliced yellow onion
  • 2 each sliced tomatoes
  • 1 each lettuce

Instructions

Preperation

  • Dice two of the jalapeños into approximately 1/4-inch chunks. Try to keep them even so they will incorporate better into the burger meat. Take your other two jalapeños and slice them into even round slices to reserve for topping. If you want your burgers less spicy, go ahead and deseed the jalapeños prior to incorporating into the meat, or topping the burger upon completion
  • Put your hamburger meat into a large bowl, and gently start mixing the diced jalapeños throughout. It’s important that you don’t handle the meat too much, as it can cause the texture of your burger to be mushy after cooking
  • Once the jalapeños are incorporated evenly, you can begin to patty your burgers. When making the patties, try to be mindful of the size of buns you will be using and make your patties according. We recommend making them no thicker than 1 inch for this recipe. If you make them larger, just be aware your cooking times will vary
  • After you have finished making your patties, take your thumb and push on the center of the patty to create a little indentation. This will prevent the burger from swelling up during the cooking process
  • At this point, you are ready to season your burger. Start with a medium layer of SPG, followed by a light to medium layer of 1836 Beef Rub. Or season to your preferred taste
  • After you have seasoned your burgers, put them in the fridge to chill while you start the grill. Chilling the burgers will help prevent crumbling while the burgers cook, because the fat in the meat may start to melt while handling. You can also take this opportunity to fry up your bacon, or you can also do this on the grill while the burgers are cooking. If cooking on the grill, we recommend using a cast-iron skillet or grill safe pan as bacon grease will cause unwanted flareups
    Seasoned and prepped bacon jalapeno burger patty

Cooking

  • To cook these burgers, you will want your grill to be at approximately 400°. Once your grill has warmed up and is holding at approximately 400°, put your burgers on and close the lid
  • After 10 minutes, it is time to flip your burgers. Flip your burgers and let them go approximately 5 more minutes and start checking for doneness. Food safety guidelines recommend cooking your burgers to 160° internal temperature. It should be noted that actual cook times will vary by the grill
  • When you have about 3 minutes left of cooking on the burgers, take your BBQ sauce and brush the tops and sides, of the burgers, and then add your cheese. Close the lid and let the burgers cook until the cheese is fully melted
  • Once the cheese is melted, put the burgers on a platter and let them rest for approximately 5 minutes
  • While the burgers are resting, use this time to throw your buns on the grill for approximately 1 minute to toast them
  • After your burgers have rested, and your buns are toasted, you can now begin to build your burger. We recommend building from the bottom starting with the bottom bun, tomatoes, lettuce, onions, burger patty, bacon, jalapeños, a drizzle of BBQ sauce, and then the top bun

Serving

  • Serve and enjoy!
  • Congratulations! You have just made SuckleBusters BBQ Bacon Jalapeño Burgers that will be the talk of your guests at your next cookout!

Cajun Chicken Wings

BBQ Glazed Spicy Cajun Wings

A sweet and spicy BBQ chicken wings with a cajun kick of heat!
Prep Time15 minutes
Cook Time30 minutes
Total Time45 minutes
Course: Appetizer, Side Dish, Snack
Cuisine: BBQ
Servings: 6 People
Cost: $10

Equipment

  • BBQ Grill

Ingredients

Instructions

Preperation

  • If your wings are whole, break them down by separating the drum from the flat. Discard the tips or save them for making stock.
  • Apply 1 Tablespoon of olive oil to the wings, coat thoroughly.
  • Season the wings with an even coat of Gators Cajun Seasoning.

Cooking

  • Preheat your grill or smoker to 350°
  • After the smoker is preheated, put the wings on and set a timer for 12 minutes
  • While your wings are cooking prepare your sauce by mixing 1 Cup of SuckleBusters Original BBQ Sauce and 1/2 Cup of SuckleBusters Honey BBQ Glaze and Finishing Sauce and began to warm it up to thin it down a bit. Warming it will give a nice even glaze on the wings
  • After 12 minutes, flip wings and let them cook for another 12 minutes
  • After 24 minutes of total cook time, check the internal temperature of the wings. You’re looking to get them to 175-185° internal to get the wings tender
  • When your wings have reached 175-185° internal temperature, dip your wings in the sauce to give them a nice even glaze. Then return them to the smoker and let the sauce sit for 10-15 minutes
    bbq chicken wings

Serving

  • Plate your wings and include your favorite dipping sauce! These wings are perfect for game day, or appetizers at your next party!
    Finished chicken wings with BBQ sauce Glaze

Texas-Style Brisket Recipe

Texas Style Smoked Brisket

Are you looking to barbecue a moist, tender and delicious beef brisket? In this video, we tackle Texas backyard brisket. This is an easy, step-step-by-step instructional video of how to prep and cook that perfect beef brisket, Texas Style!
Prep Time30 minutes
Active Time8 hours
Total Time8 hours 30 minutes
Yield: 15 People
Cost: $50

Equipment

  • BBQ Smoker or Grill
  • Sharp knife
  • Pink Butcher Paper
  • Thermometer

Materials

Instructions

Preperation

  • Remove the brisket from its packaging and place it on a cutting board fat side up to begin the trimming process. When trimming the fat side, the goal is to get it to an even 1/4 inch layer of fat across the brisket.
    Untrimmed Packer Brisket
  • Next, flip the brisket over and trim the meat side removing the silver skin and chunks of hard of fat as these will not render in the smoking process. It’s also beneficial to remove any sharp edges and round the brisket off as these areas will often dry out first. You can spend as long or as little time as you want to trim this side.
  • After you’ve completed your trimming, the next step is to flip the brisket over so the fat side is up. You’ll then want to add a tablespoon of yellow mustard and coat the entire brisket evenly. This will help the rub adhere to your brisket. The mustard will not leave any taste after the brisket is cooked. 
  • Next, apply the rubs. Start with a light coating of SuckleBusters SPG rub, followed by a heavier coating of 1836 Beef Rub which will really drive that Texas flavor home.
  • Then, flip the brisket over and repeat the process. Yellow mustard, SPG, and 1836 Beef Rub and don’t forget to season the edges of the brisket as well.

Cooking

  • To cook your brisket, fire up your pit to 250° Fahrenheit. Once it’s up to temp, place the brisket on the smoker, close the lid. This is where the waiting begins.
  • Once your brisket reaches an internal temperature of 165° Fahrenheit in the thickest part of the meat, it is time to wrap the brisket. By this time you should have a beautiful dark crust forming, also known as “the bark”. The process can take anywhere from 4 – 6 hours (or more) depending on the type of smoking you are using.
  • To wrap your brisket, use two sheets of pink butcher paper and set them on the table. Place your brisket in the center, and then wrap the end closest to you over the brisket, tucking it under the edge, and flip the brisket. Then take the edges, fold them in, and flip the brisket again. At this point, the fat cap should be back down, and it’s time to get the brisket back on the pit to continue cooking. 
  • Once the brisket hits about 195° degrees internal temperature, you want to start checking for tenderness. If your thermometer goes into the brisket with no resistance, the brisket is done. For reference, it should feel like you’re probing room temperature butter. The average temperature for a fished brisket is usually 200 – 205°.

Serving

  • When your brisket is finished cooking, wrap it in a heavy towel or blanket and place it in a dry cooker. Allow it to rest for at least 1 hour, Just be sure to not let the internal temp get below 140° for food safety purposes.
  • After the brisket has rested, it’s time to enjoy all your hard work. Unwrap the brisket and put it on a cutting board. Slice it flat against the grain in about pencil width slices. Once you get to the part of the brisket where the point and flat meet each other, cut the brisket down the center, and continue to slice your slices from the center out, being sure to cut against the grain.
  • Congratulations! You have just cooked your first SuckleBusters Texas Style Brisket! Enjoy it sliced, or throw a few slices on a piece of Texas Toast with some pickles, onions, and your favorite sauce (we recommend SuckleBusters Original BBQ Sauce).
  • Serve and Enjoy!
    Brisket ready to serve

Video