Category Archives: Beef

Beef Birria Tacos

Beef Birria Tacos

Simply the BEST tacos you will ever make!
Prep Time1 hour
Cook Time4 hours
1 hour
Total Time6 hours
Course: Main Course
Cuisine: BBQ, Mexican
Keyword: BBQ, Beef, Birria, Tacos
Servings: 24 Tacos
Author: Dan Arnold

Equipment

  • 1 Flat Top Griddle Treager Flatrock
  • 1 Smoker or Grill Big Green Egg XL
  • 1 Vita Mix or other blender Viat Mix 310

Ingredients

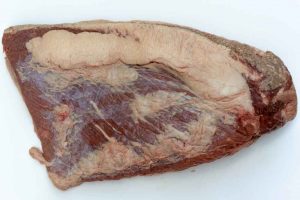
  • 4 Lbs beef chuck roast
  • 24 each corn tortilla
  • 24 oz shredded cheese
  • 6 each chiles guajillo dried
  • 3 each chiles ancho dried
  • 3 each chiles pasillas dried
  • 2 each yellow onion
  • 1 each carrot
  • 2 each jalapeno peppers fresh
  • 1 each serrano peppers fresh
  • 3 each tomatoes medium
  • 6 cloves garlic fresh
  • 2 each 32 oz beef stock or beef broth
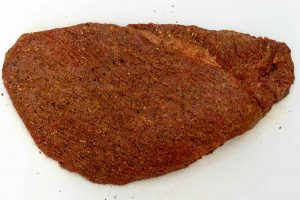
  • 4 oz SuckleBusters 1836 Beef Rub
  • 4 tbsp olive oil
  • 1 tbsp salt or to taste

Spice Blend

  • 1/4 tsp cinnamon powder
  • 1/4 tsp cumin powder
  • 1 tbsp oregano
  • 1 tbsp SuckleBusters 1836 Beef Rub
  • 3 each whole bay leaves

Garnish

  • 4 each limes sliced
  • 1 bunch cilantro chopped
  • 1 each yellow onion fine chopped
  • 2 each jalapenos and/or serrano peppers fine chopped

Instructions

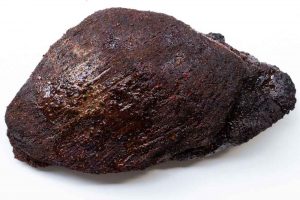
Step 1 – Prepare and Cook Beef

  • Set Smoker to 300 degrees cooking temperature
    Beef Chuck Roast prep
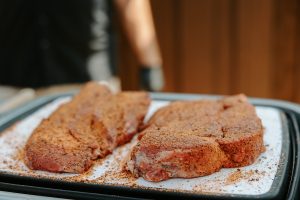
  • Heavily season beef chuck with SB 1836 Beef Rub
  • Place beef on the smoker and cook until 160 degrees internal temperature
  • (While meat is cooking – begin cooking vegetables and chiles)

Step 2(a) – Prepare and Cook Vegetables

  • Set Grill to high heat – approx. 400 – 500 degrees cooking temperature
    Chopped Vegetables
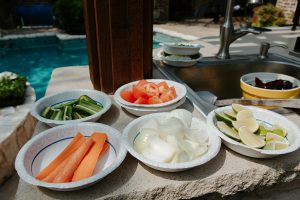
  • Rough chop 1 onion, 1 carrot, 2 jalapenos, 1 serrano chile
  • Place vegetables in cast iron skillet, add 2 – 3 TBSP olive/cooking oil
  • Place on high heat grill to sauté
  • As vegetables begin to caramelize/turn brown, then add tomatoes
  • As tomatoes begin to break down, add 6 cloves crushed garlic
  • After adding garlic, cook for approx 1 – 2 minutes, then deglaze the skillet with 1 cup beef stock
    Grill the Vegetables
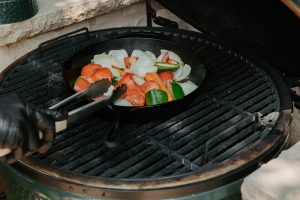
  • Remove skillet from heat and reserve

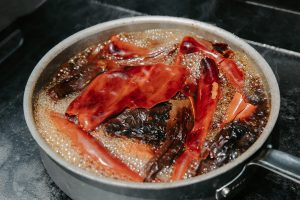
Step 2(b) – Prepare and cook Chiles

  • Deseed 8 guajillo, 3 ancho and 3 pasillo chiles
  • Add all chiles to a 2 quart saucepan and cover with water
  • Cook chiles until tender
  • Remove the saucepan from the heat and reserve

Step 2 (c) – Puree Vegetables and Chiles

  • Add the cooked vegetable to a Vita mix (blender), pour over juices from the skillet
    Add red chilies
  • Remove the chiles from water and add to the blender
  • Add 24 oz beef broth to the blender
  • Blend on low to incorporate, then high setting for 30 – 45 seconds until smooth

Step 3- Add all ingredients to a Dutch oven and finish cooking

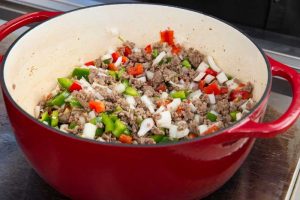
  • Add the pureed vegetables and chiles to the Dutch oven
    Beef Stock in a dutch oven
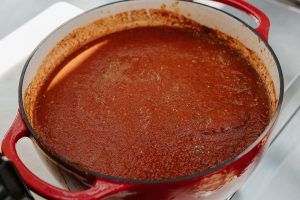
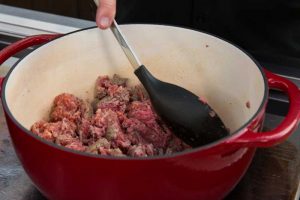
  • Add the cooked beef to the Dutch Oven
  • Add the Spice Blend above to the Dutch oven
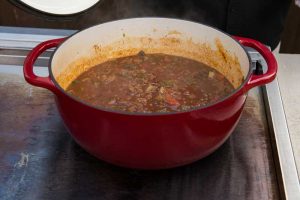
  • Cook on low heat (slight boil) until the meat is fall-apart tender, about 2 hours
  • Optional – Add more beef stock as needed to your desired thickness
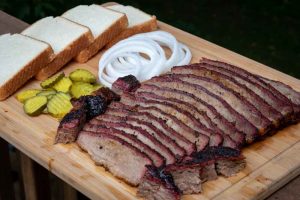
Assemble Tacos

  • Set the griddle to medium-high heat
    Pulled Beef Chuck
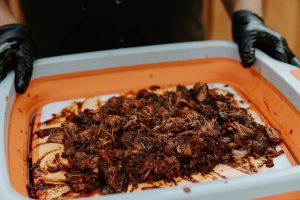
  • Remove the meat from the Dutch oven and chop, reserve
  • Dip corn tortilla in the vegetable and chile stock and place on griddle
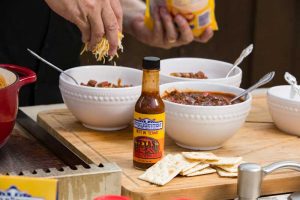
  • Add 2 oz shredded cheese
  • Add 2 oz shredded beef
  • Fold over into a taco and cook until cheese melts and tortilla are slightly crisp
    Finish birria tacos on the griddle
  • Remove and reserve

Serve

  • Add cilantro, onions, jalapenos plus a squeeze of lime and serve
  • Enjoy!
    Serve and enjoy

Video

Bacon Double Smash Burgers

Bacon, Double-Cheese Smash Burgers

Native Australian, Ben Surman shows us how to grill awesome smash burgers!

Bacon Double Smash Burgers
Print
5 from 3 votes

Bacon-Double-Cheese Smash Burgers

Grilled Aussie-Style, smashed, cheeseburgers with bacon
Prep Time20 minutes
Active Time20 minutes
Assembly5 minutes
Total Time45 minutes
Course: Main Course
Cuisine: American, Bacon, Burgers
Keyword: Bacon, Cheeseburger, Hamburger, smashburger
Yield: 4 Cheeseburgers
Cost: $20

Equipment

  • Griddle bbq or large flat grillling surface
  • Large spatula
  • Instant read thermometer

Materials

  • 1.5 lbs Ground beef 80/20
  • 4 each buns brioche recommended
  • 12 slices bacon
  • 8 slices American cheese
  • 1/2 each sliced yellow onion
  • 2 tbsp SuckleBusters Campfire Steak Seasoning
  • 1 oz dill pickles
  • 1 oz ketchup
  • 1 oz mustard

Instructions

Cook the bacon

  • Set griddle or cooktop to medium-high heat
  • Place 8 – 12 strips of bacon on the griddle
  • Turn and cook both sides until crisp, then remove from the heat and reserve
  • HINT: Leave the bacon grease on the griddle for cooking the burger patties

Make tinfoil tent domes

  • Using 1 10" x 10" sheet of aluminum foil, make a dome large enough to cover a patty
  • Make 1 tinfoil dome per patty and set aside for later use

Cook the Smash Burgers

  • Incorporate 2 tbsp Campfire Steak Seasoning evenly thoughout the meat
  • Divide the meat evenly into 4 – 6 oz balls
    Tented burger and meat patty
  • Place the 4 balls on the griddle and smash flat with large spatula or the botton, flat area of a large cooking dish
  • The goal is to smash the patties until they are slightly larger than the buns
  • Once a dark crust is formed on the bottom of the patty, flip the burger over
  • Place 2 slices of cheese on top and then tent with a foil dome
  • Check your burger patty for doneness with an instant-read thermometer, remove from heat when done, reserve
    Grilled cheese burgeres with bacon
  • HINT: Well done is 160 degrees internal temperature. Pull at 155 degrees as the meat temp will rise about 5 degrees after removing from the heat

Assemble the smash burgers

  • Grill the buns until lightly toasted
    Bacon Double Smash Burgers
  • Start from the bottom and build up; bottom bun, meat & cheese, bacon, sliced onion, pickles, condiments with the top bun
  • HINT: Go Aussie-Style by adding lettuce, tomato, pickled beetroot, and a fried egg!

Serve and Enjoy!

    Texas Chili Recipe

    SuckleBusters Texas Chili

    Winner of Chile Peppers Magazine recipe two years in a row!
    Prep Time30 minutes
    Cook Time1 hour
    Course: Main Course
    Cuisine: American, BBQ
    Keyword: Chile, Chili, Texas Chili, Texas Red
    Servings: 6 people
    Cost: 10

    Equipment

    • Large Cooking Pot
    • Cutting Board

    Ingredients

    • 1 Lb ground beef (large chili grind recommended)
    • 1 Lb ground pork (or breakfast sausage)
    • 1 each yellow onion
    • 1 each green bell pepper
    • 1 each red bell pepper
    • 1 cup beef broth
    • 8 oz tomato sauce
    • 6 – 8 tbsp SuckleBusters Texas Chili Powder

    Instructions

    • Brown the chili meat and sausage in a large skillet. Drain and discard the excess drippings. Add the browned meat to a large dutch oven or 6-quart cooking pot.
      Brown the beef and pork
    • Finely chop the onion and bell peppers, add to the dutch oven, cook until translucent.
      Diced onion and peppers
    • Add the beef broth, tomato sauce and chili powder. Stir until all ingredients are combined.
      Add all ingredients and cook
    • Bring to a low boil, cover, then reduce temperature to a simmer for 1 hour, stirring often. Add water as needed and salt to taste. 
    • Remove from heat, serve in bowls top with chopped onions and shredded cheese. This recipe won 1st place in Chile Pepper Magazine Awards in 2013 & 2014. Enjoy!
      Serving the finished chili

    Video

    Bacon Jalapeno Burger

    Bacon Jalapeno Cheeseburger

    Spicy and Tasty, the fresh jalapenos bring the heat to this cheeseburger recipe
    Prep Time30 minutes
    Cook Time15 minutes
    Total Time15 minutes
    Course: Main Course
    Cuisine: BBQ
    Keyword: Cheeseburger, Hamburger, Jalapeno
    Servings: 6 people
    Cost: $10

    Equipment

    • Grill or Smoker2

    Ingredients

    • 2 lbs 80/20 ground beef
    • 4 each jalapenos
    • 1 lb sliced bacon
    • 3 tbsp SPG BBQ Rub
    • 3 tbsp 1836 BBQ rub
    • 6 slices cheddar cheese
    • 6 each brioche buns

    Optional Ingredients

    • 1 each sliced yellow onion
    • 2 each sliced tomatoes
    • 1 each lettuce

    Instructions

    Preperation

    • Dice two of the jalapeños into approximately 1/4-inch chunks. Try to keep them even so they will incorporate better into the burger meat. Take your other two jalapeños and slice them into even round slices to reserve for topping. If you want your burgers less spicy, go ahead and deseed the jalapeños prior to incorporating into the meat, or topping the burger upon completion
    • Put your hamburger meat into a large bowl, and gently start mixing the diced jalapeños throughout. It’s important that you don’t handle the meat too much, as it can cause the texture of your burger to be mushy after cooking
    • Once the jalapeños are incorporated evenly, you can begin to patty your burgers. When making the patties, try to be mindful of the size of buns you will be using and make your patties according. We recommend making them no thicker than 1 inch for this recipe. If you make them larger, just be aware your cooking times will vary
    • After you have finished making your patties, take your thumb and push on the center of the patty to create a little indentation. This will prevent the burger from swelling up during the cooking process
    • At this point, you are ready to season your burger. Start with a medium layer of SPG, followed by a light to medium layer of 1836 Beef Rub. Or season to your preferred taste
    • After you have seasoned your burgers, put them in the fridge to chill while you start the grill. Chilling the burgers will help prevent crumbling while the burgers cook, because the fat in the meat may start to melt while handling. You can also take this opportunity to fry up your bacon, or you can also do this on the grill while the burgers are cooking. If cooking on the grill, we recommend using a cast-iron skillet or grill safe pan as bacon grease will cause unwanted flareups
      Seasoned and prepped bacon jalapeno burger patty

    Cooking

    • To cook these burgers, you will want your grill to be at approximately 400°. Once your grill has warmed up and is holding at approximately 400°, put your burgers on and close the lid
    • After 10 minutes, it is time to flip your burgers. Flip your burgers and let them go approximately 5 more minutes and start checking for doneness. Food safety guidelines recommend cooking your burgers to 160° internal temperature. It should be noted that actual cook times will vary by the grill
    • When you have about 3 minutes left of cooking on the burgers, take your BBQ sauce and brush the tops and sides, of the burgers, and then add your cheese. Close the lid and let the burgers cook until the cheese is fully melted
    • Once the cheese is melted, put the burgers on a platter and let them rest for approximately 5 minutes
    • While the burgers are resting, use this time to throw your buns on the grill for approximately 1 minute to toast them
    • After your burgers have rested, and your buns are toasted, you can now begin to build your burger. We recommend building from the bottom starting with the bottom bun, tomatoes, lettuce, onions, burger patty, bacon, jalapeños, a drizzle of BBQ sauce, and then the top bun

    Serving

    • Serve and enjoy!
    • Congratulations! You have just made SuckleBusters BBQ Bacon Jalapeño Burgers that will be the talk of your guests at your next cookout!

    Texas-Style Brisket Recipe

    Texas Style Smoked Brisket

    Are you looking to barbecue a moist, tender and delicious beef brisket? In this video, we tackle Texas backyard brisket. This is an easy, step-step-by-step instructional video of how to prep and cook that perfect beef brisket, Texas Style!
    Prep Time30 minutes
    Active Time8 hours
    Total Time8 hours 30 minutes
    Yield: 15 People
    Cost: $50

    Equipment

    • BBQ Smoker or Grill
    • Sharp knife
    • Pink Butcher Paper
    • Thermometer

    Materials

    Instructions

    Preperation

    • Remove the brisket from its packaging and place it on a cutting board fat side up to begin the trimming process. When trimming the fat side, the goal is to get it to an even 1/4 inch layer of fat across the brisket.
      Untrimmed Packer Brisket
    • Next, flip the brisket over and trim the meat side removing the silver skin and chunks of hard of fat as these will not render in the smoking process. It’s also beneficial to remove any sharp edges and round the brisket off as these areas will often dry out first. You can spend as long or as little time as you want to trim this side.
    • After you’ve completed your trimming, the next step is to flip the brisket over so the fat side is up. You’ll then want to add a tablespoon of yellow mustard and coat the entire brisket evenly. This will help the rub adhere to your brisket. The mustard will not leave any taste after the brisket is cooked. 
    • Next, apply the rubs. Start with a light coating of SuckleBusters SPG rub, followed by a heavier coating of 1836 Beef Rub which will really drive that Texas flavor home.
    • Then, flip the brisket over and repeat the process. Yellow mustard, SPG, and 1836 Beef Rub and don’t forget to season the edges of the brisket as well.

    Cooking

    • To cook your brisket, fire up your pit to 250° Fahrenheit. Once it’s up to temp, place the brisket on the smoker, close the lid. This is where the waiting begins.
    • Once your brisket reaches an internal temperature of 165° Fahrenheit in the thickest part of the meat, it is time to wrap the brisket. By this time you should have a beautiful dark crust forming, also known as “the bark”. The process can take anywhere from 4 – 6 hours (or more) depending on the type of smoking you are using.
    • To wrap your brisket, use two sheets of pink butcher paper and set them on the table. Place your brisket in the center, and then wrap the end closest to you over the brisket, tucking it under the edge, and flip the brisket. Then take the edges, fold them in, and flip the brisket again. At this point, the fat cap should be back down, and it’s time to get the brisket back on the pit to continue cooking. 
    • Once the brisket hits about 195° degrees internal temperature, you want to start checking for tenderness. If your thermometer goes into the brisket with no resistance, the brisket is done. For reference, it should feel like you’re probing room temperature butter. The average temperature for a fished brisket is usually 200 – 205°.

    Serving

    • When your brisket is finished cooking, wrap it in a heavy towel or blanket and place it in a dry cooker. Allow it to rest for at least 1 hour, Just be sure to not let the internal temp get below 140° for food safety purposes.
    • After the brisket has rested, it’s time to enjoy all your hard work. Unwrap the brisket and put it on a cutting board. Slice it flat against the grain in about pencil width slices. Once you get to the part of the brisket where the point and flat meet each other, cut the brisket down the center, and continue to slice your slices from the center out, being sure to cut against the grain.
    • Congratulations! You have just cooked your first SuckleBusters Texas Style Brisket! Enjoy it sliced, or throw a few slices on a piece of Texas Toast with some pickles, onions, and your favorite sauce (we recommend SuckleBusters Original BBQ Sauce).
    • Serve and Enjoy!
      Brisket ready to serve

    Video